
Our support staff strive every day to provide our customers with help and advice and to assist them with any difficulties they may have when using 1Tool. Nevertheless, many customers often have the same questions. That is why we have summarized the three most frequently asked 1Tool FAQs for you and answered them in detail.
Question #1: Why do hard bounces and soft bounces not receive newsletters and are blocked?
It is important to divide your contacts into hard and soft bounces:
- Hard bounces are permanently undeliverable emails. These can be caused by invalid addresses (e.g. incorrect spelling, unknown domain) or blocking of the mail server by the recipient’s mail server.
- Soft bounces are emails that are temporarily undeliverable. Reasons for soft bounces could be a full mailbox of the recipient, automatic out-of-office messages, an overloaded server or an email that is too large.
If you now send a newsletter to your contacts and there are hard bounces and soft bounces among them, this is immediately registered by the server. In the 1Tool, the “Receives mail newsletter” field is then automatically deactivated for all the corresponding contacts in the master data and they will not receive any further mailings.
A related question is often: How can hard bounces and soft bounces be unlocked again?
To unblock hard bounces and soft bounces, it is first necessary to reactivate the “Receives mail newsletters” field for all contacts. As softbounces could only be temporarily undelivered, you should send the next newsletters to these addresses again without making any further changes. If the same soft bounce occurs again and again, it will automatically be converted to a hard bounce after some time. In the case of hard bounces, it is also important to clean up the non-existent e-mail address. First check the spelling and otherwise make sure that you actually have the current e-mail address of your recipient.

Question #2: Why does the number of my contacts differ from those who are entered as recipients when the newsletter is sent?
If you want to send a newsletter to your contacts, it can happen that the number of contacts in the recipient list and the contacts generally stored in the 1Tool differ. There can be many reasons for this discrepancy.
The following contacts are not added to the recipient list:
- Contacts for whom no e-mail address has been stored
- Contacts that were previously classified as hard bounces or soft bounces and blocked (see also question 1)
- Contacts who have already unsubscribed from one of your previous newsletters (the “Receives mail newsletter” field in the contact view is automatically deactivated when the recipient unsubscribes)
- Contacts for whom the same e-mail address has been stored
Example: Two contacts have the same email address, such as office@koerbler.com, entered in their master data. The recipient list for sending newsletters always lists all recipients according to their email addresses. In order to avoid sending to the same address twice, it is only listed once in the recipient list. - Contacts for whom the e-mail address has been entered in the “E-mail 2” field within the master data (always store the e-mail addresses of a newsletter recipient in the “Mail” field)
- Contacts that were excluded as recipients due to the previously defined restrictions (via the various filter functions)
Question #3: How can I easily assign contacts from a specific location/region to a distribution list?
First call up the contact search and click on the “Details” tab. You will now see all the fields that you can use to search your entire contact database. To filter out people from a specific city or region, go to the fields Postcode, City, State. One of the simplest variants would be to enter the city or state in the respective field and start the search. For example, if you want to assign all customers based in Leibnitz to a distribution list, enter “Leibnitz” in the City field.
However, if you would like to move all contacts from the Leibnitz district to a distribution list, you must carry out your search using the “Postcode” field.
Options for finding contacts by zip code
When entering in the zip code field, you can distinguish between two characters. A percentage sign (so-called joker) replaces any number in the search, while an underscore (so-called wildcard) always stands for any number.
POSSIBILITY 1:
To restrict your contacts to the Leibnitz area, enter 84__ (two underscores, without spaces). This defines that you only want to filter out contacts with four-digit zip codes beginning with 8 and 4.
POSSIBILITY 2:
Contacts from Styria also have four-digit zip codes beginning with 8. So as soon as you enter 8___(three underscores, without spaces) in the “Postcode” field in the search, all contacts from Styria will appear in the search results.
POSSIBILITY 3:
You want to search for all contacts from Styria but also from Bavaria (DE). In contrast to Austrian zip codes, these have 5 digits in Germany. Zip codes for both Styria and Bavaria always start with the number 8, so enter 8% (a percent sign, without spaces) in the search field to filter out contacts with both four and five-digit zip codes.
Once you have filtered out all your contacts that you would like to assign to a distribution list using the search, follow the steps below:
- Select all the relevant contacts. If you want to assign all listed contacts to a distribution list, select the top checkbox in the left-hand column and all contacts will be selected automatically. If you would like to select certain contacts from your list, mark them accordingly using the field in front of their name.
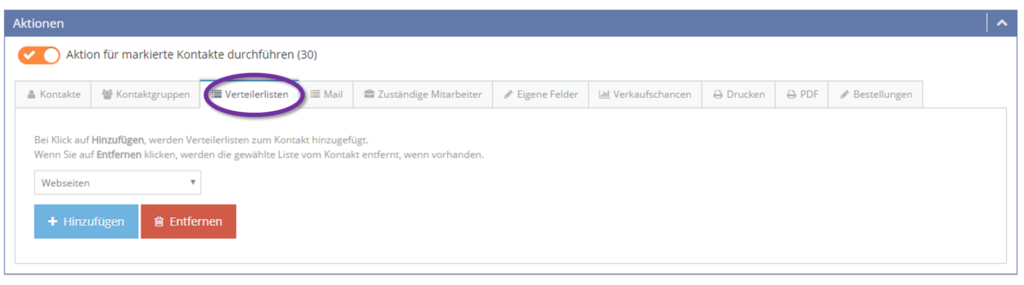
- Scroll down to the “Actions” area and click on the right arrow symbol in the blue bar.
- Make sure that the “Perform action for selected contacts” checkbox is activated (orange) and that the number of selected contacts is displayed in brackets.
- Now click on the “Distribution lists” tab and select the relevant distribution list via the corresponding field.
- Depending on whether you want to add the selected distribution list to the contacts or remove it from them, click on the corresponding button.
You can find detailed step-by-step instructions including screenshots in our manual.